Pool Filter Leaking? The 8 Leak Points, in Order of Likelihood (Diagnose in Five Minutes)

A leaking pool filter is almost always one of eight specific points, and the odds favor the cheap ones: the tank lid O-ring (dried silicone grease — the single most common), the clamp assembly’s gasket at split-tank seams, the drain plug’s washer, and the spider gasket under the multiport valve cover four out of five diagnoses between them. The method that finds yours in five minutes: dry the whole assembly with a towel, run the pump, and watch where the water reappears first — top-down, in the order below. The one leak that changes category entirely: a crack in the tank shell itself, which is a pressure-vessel retirement, not a repair.
The search results for this problem are videos and social posts — which tells you the topic is being solved by pointing cameras at wet concrete rather than explained. The Reddit posts are the same story told in text: “small leak from the sand filter bottom cap” with a photo, and the replies are pool guys naming the part from the photo in one line, because the parts are that predictable. This page is those one-line diagnoses, organized into the sequence a pro actually checks, with the fix and the part for each.
Quick Answer: The Eight Leak Points

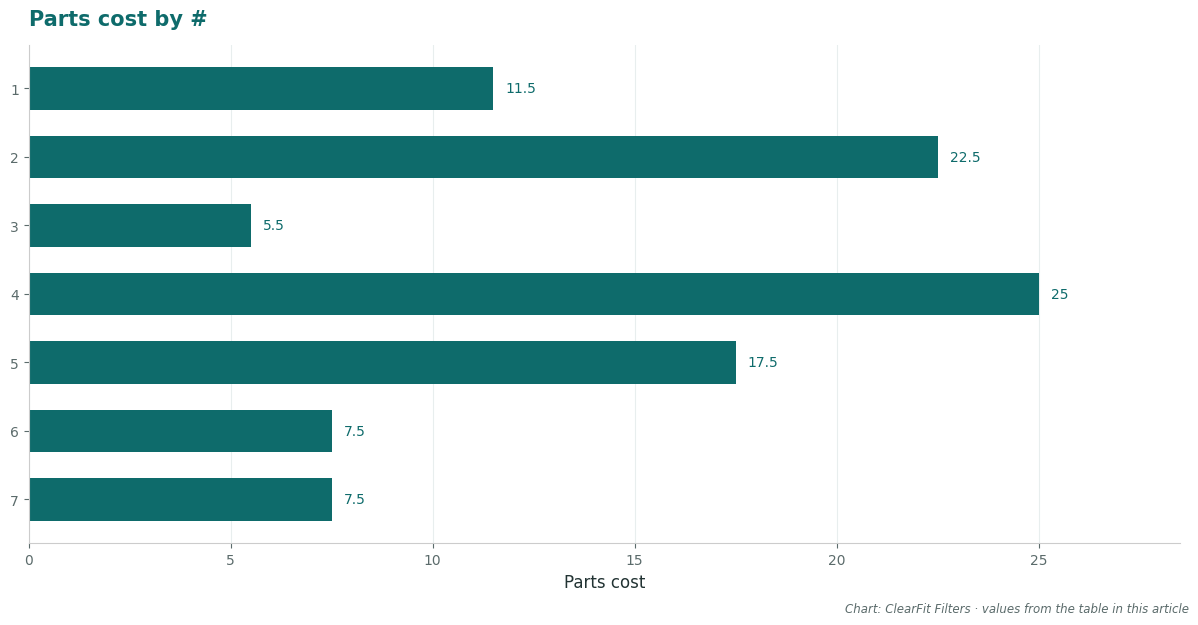
| # | Leak point | Where the water shows | Cause | Fix | Parts cost |
|---|---|---|---|---|---|
| 1 | Lid O-ring | Around the tank lid ring / clamp | Dried, flattened, or unseated O-ring | Clean, re-grease (silicone), reseat or replace | $8–15 |
| 2 | Clamp / split-tank gasket | At the horizontal tank seam under the clamp | Gasket aged/compressed; clamp tension wrong | New gasket; torque clamp evenly to spec | $15–30 |
| 3 | Drain plug | Bottom of tank, at the cap | Washed-out plug washer, loose cap | New washer, thread tape if tapered | $3–8 |
| 4 | Spider gasket (multiport) | Under the valve, dripping at position changes | Rotor rotated under flow / age | Replace spider gasket (valve disassembly) | $15–35 |
| 5 | Valve shaft seal | Where the valve handle shaft enters | Worn shaft O-ring | Seal kit, top-side repair | $10–25 |
| 6 | Pressure gauge / air bleeder port | At the gauge threads on the valve | Failed tape/seal | Remove, re-tape (PTFE), refit | ~$0–15 |
| 7 | Pipe unions & threaded fittings | At plumbing connections in/out of the valve | Union O-ring, failed thread seal | Union O-ring; re-seal threads | $3–12 |
| 8 | Tank shell crack | Weeping hairline on the tank body | Age/freeze damage | Replace the tank — not a repair item | — |
The ordering is the value: water appears at the highest wetted point above the visible drip — a drip at the base often travels from the lid or clamp. Dry-everything-first isn’t a suggestion; tracing a wet assembly diagnoses nothing.
The Five-Minute Diagnostic (Step by Step)
- Pump off, towel dry the entire filter and valve assembly — base, seams, valve body, plumbing connections.
- Pump on, stand back, watch. Water reappearing at a point = that point; water tracking down from above = follow it up.
- Check the lid O-ring first (cartridge tanks): the classic sign is a ring of dampness or spray at the lid under pressure, and the cause on disassembly is a rock-hard O-ring that hasn’t seen grease in years.
- Split-tank next (two-piece sand/DE tanks): the clamp seam — look for the wicking line along the joint. Note whether the clamp’s bolts show corrosion (age signal).
- Work down to the drain plug, then the valve — spider gasket leaks characteristically drip under the multiport and often change with valve position.
- Anything that looks like a crack in the shell itself: mark it with a pencil, dry it, watch the mark. A weeping hairline that refills = the tank is done (below).
Pressure matters diagnostically: some leaks (shaft seals, spider gaskets) show only at running pressure, while others (drain plugs) drip constantly. Note when yours weeps — it narrows the list.
The Three Big Ones in Detail
The lid O-ring (cartridge systems’ #1). Every tank opening compresses the O-ring; every year without silicone grease hardens it. The fix is trivial — clean the groove, inspect the ring for flat spots and nicks, grease with pool-rated silicone lubricant (never petroleum jelly, which swells rubber), reseat evenly. The discipline worth adopting: a swipe of grease at every cartridge change costs nothing and deletes the most common leak in the category.
The spider gasket (multiport valves). The multiport’s rotor seals against a gasket with channels for all six positions (valve logic). Two things kill it: age, and rotating the handle with the pump running — the water-hammer twist tears the gasket’s webs. Symptoms: dripping or tracking under the valve, and cross-position leakage (water running to waste during FILTER, or gauge oddities). The replacement is a valve-top disassembly — fiddly but a DIY job with the model’s kit; the gasket must match the valve model exactly.
The clamp seam (split tanks). Hayward/Pentair-style two-piece tanks seal at a molded groove with a rubber gasket under a metal clamp band. Aged gaskets compress; freeze-damage in cold-climate installations distorts the seating surfaces. Replacing the gasket and re-torquing evenly (a little at a time, alternating bolts) fixes the aging case. Freeze-cracked tanks and seats are category 8 below — replacement.
Thread Sealants vs O-Rings (Which Fix Goes Where)
A recurring confusion in the fix step: threads and O-rings seal differently, and the products don’t interchange. Threaded plumbing joints (gauges, fittings, some plugs) seal with PTFE tape or pipe sealant — wrapped/applied on the threads. O-rings and gaskets (lids, unions, clamps, spider) seal by compression and need clean surfaces, correct sizing, and silicone grease — putting tape on an O-ring seat does nothing, and putting grease where thread sealant belongs weeps forever. Every leak point in the table above is one or the other; the fix column follows accordingly.
Leak Point 8: The Tank Crack (When It Stops Being a Repair)
A weeping hairline in the shell — commonly near the seam, the drain boss, or a freeze-exposed face — is the end of the tank’s life. These are pressure vessels: a crack that today weeps under 20 psi is a crack propagating through a fatigue path, and no epoxy or wrap changes the structural math (warranty certainly doesn’t). The sequence: confirm it’s the shell and not a gasket above it (dry-and-watch), then plan replacement — at which point the system-choice question reopens (aging sand tank needing more than media is the classic convert-to-cartridge moment), and the closing procedure for your climate explains why it cracked if it’s a freeze zone.
FAQ
How do I stop my filter from leaking?
Identify the point first — dry everything, run the pump, trace the water to its highest origin — then apply the fix the table specifies: grease or replace the lid O-ring, replace the clamp or spider gasket, re-tape the gauge or drain threads. Seven of the eight leak points are under-$35 part swaps; the eighth (tank shell crack) is replacement. Diagnose before buying parts: the drip location frequently isn’t the leak location.
How often should a pool filter O-ring be replaced?
Inspect at every opening — replace at the first flat-spotting, cracking, or compression set (typically 2–4 years), and grease with silicone at every service regardless. An O-ring that’s been running dry is the most common leak cause in the category, and the grease that prevents it costs less than the O-ring. Lid O-rings, union O-rings, and the pump’s strainer-cover ring all follow the same rule.
What could be causing my water filter to leak from the bottom?
At the tank’s base, two candidates: the drain plug’s washer (most likely — a $3–8 fix: new washer, re-tape if the plug is tapered) and the tank shell (a weeping hairline near the base = replacement territory). Distinguish them with the dry-and-watch test at the plug itself: water emerging from the plug’s center is the washer; water tracking along the shell to the base is the crack.
How do I get my pool pump to stop leaking?
Pump leaks are their own micro-category adjacent to the filter: the strainer lid O-ring (dry, misseated — grease and reseat), the shaft seal behind the impeller (drip under the pump body between motor and volute — a seal-kit job), and the plumbing unions at the pump’s inlets/outlets. Filter-side fixes don’t apply to the shaft seal: that one progresses and is worth fixing promptly before it damages the motor bearing.
Sources & References
- Retailer catalog parts diagrams and service data (O-rings, spider gaskets, clamp assemblies, seal kits by model). Official documentation (explicit).
- Pressure-vessel replacement guidance — shell crack treatment conventions. Industry convention (explicit).
- Silicone-vs-petroleum lubricant compatibility — rubber swell behavior. Official documentation/Industry convention (explicit).
- r/pools leak-photo threads — the one-line part-naming replies this page systematizes. Community discussion (paraphrased).
Related Guides
- How to Backwash a Pool Filter — the valve whose gaskets these are.
- Pool Closing Checklist — preventing the freeze-crack class.
- Sand vs Cartridge vs DE Pool Filters — the decision a dead tank reopens.
Find your filter: Pool & spa filter cartridges