How to Test Fluoride in Water at Home: 3 Methods, What Each Costs, and the Test-Strip Trap Nobody Mentions

Testing your own water for fluoride is one of those tasks that looks like a $15 errand and isn’t. Fluoride is the trickiest of the common home tests — there’s no dip-and-read meter the way there is for TDS or chlorine — and the most popular product in the category (test strips) has a resolution problem that makes it nearly useless for the question most people are actually asking. This page walks the three real methods in cost order (starting with the free one), tells you exactly what each can and cannot tell you, and ends with the action table that converts your number into a decision.
Why this matters before any purchase: fluoride removal equipment runs $200–2,800. The test that tells you whether you need any of it runs $0–50. We sell the equipment — which is exactly why we tell you to run the test first, including the free path that occasionally ends the whole conversation.
Why Fluoride Is the Trickiest Common Test

Chlorine has colorimetric dip strips that resolve fine differences. TDS has a $15 meter that reads to single-digit mg/L. Fluoride is a small, stable, dissolved anion that doesn’t give up easy chemistry: accurate measurement needs laboratory methods (ion-selective electrode or spectrophotometry after distillation/spadns chemistry), which is why every legitimate home method ends with a lab somewhere in the loop — you either mail the sample out or you accept the severe limits of what strips can do at consumer prices.
The practical consequences, stated up front:
- No instant handheld fluoride meter exists for consumers. Anything marketed as one is either a TDS meter wearing a “fluoride” label (measuring everything dissolved, telling you nothing) or a toy.
- Strips answer “is there a lot or a little” — they cannot answer “is it 0.7 or 1.5.” The strip-trap section below explains why that distinction is the entire game.
- The lab mail-in is the only method that produces a number you can act on — and it costs less than most people assume.
Method 1: The Free Option — Your Consumer Confidence Report (City Water)
If you’re on a municipal supply, your utility already tested your water, and federal law requires them to tell you the result every year.
How to find it: search “[your city] consumer confidence report” or “[your utility] water quality report” — utilities must deliver it annually (by July 1) and keep it posted online. Find the fluoride row (sometimes under “inorganic contaminants”). It will show the range detected and the average for the sampling year.
How to read it, honestly:
- 0.6–0.9 mg/L — the fluoridation operating band (target 0.7). Your number is the deliberate national standard, not an accident.
- A range crossing 2.0 — rare but worth attention: some systems with natural fluoride blend sources and report wider ranges; any excursion above 2.0 should appear with the utility’s explanation.
- “Not detected / below reporting level” — your system doesn’t fluoridate and has no natural fluoride; the removal question is closed.
Limits of the free option: the CCR describes the system’s water at its monitoring points, not your kitchen tap — fine for fluoride (it’s stable and utility-set, unlike lead which your pipes alter). Distribution variance for fluoride is minimal; the CCR number is your tap number to within rounding. Verdict: for city water, this method alone usually settles the question at $0.
Method 2: Lab Mail-In Kit ($30–50) — the Only Method That Gives You a Real Number
The gold standard for households: a mail-in kit with a sample vial, prepaid return, and an accredited lab’s analysis — your result arrives as a lab report with a mg/L figure, typically 7–10 business days from mailing.
How to do it right:
- Order a fluoride-specific kit (or a multi-analyte panel including fluoride — often barely more expensive and worth the bundle if you’re on a well).
- Follow the sampling protocol exactly — fluoride is forgiving compared to bacteria samples (no sterile technique or timing drama), but fill the vial fully (no air gap) and return promptly.
- Wells: sample at the kitchen cold tap, after a short flush (2–3 minutes) so you’re reading the aquifer, not the pressure tank’s Monday morning.
Reading the report: find the fluoride line, read the mg/L value, and compare against the ladder — 0.7 (fluoridation target) / 2.0 (cosmetic SMCL) / 4.0 (enforceable MCL). If you’re considering treatment, this is the number your equipment sizing depends on — and if the result comes back above ~2.0 on a well, a retest at a second lab is cheap insurance before a four-figure purchase.
Verdict: the method we recommend for every well owner and every city resident whose CCR shows a wide range. It is the only method on this page that produces decision-grade data.
Method 3: Test Strips ($10–20) — Fine for One Question, Useless for the Real One
Here’s the honest section that strip sellers don’t write. Consumer fluoride strips exist and they work — as qualitative indicators. Their resolution is the problem:
The resolution trap. Typical consumer fluoride strips resolve in coarse bands — something like 0 / 2 / 10 / 50 / 100 ppm steps (this is the actual gradient on the common strip products ranking for “fluoride test” — the 0–100+ ppm scale designed for wastewater and industrial ballpark use). The question almost every household actually has — “is my water at 0.7 or 1.5 or 2.5?” — lives entirely inside the strip’s first band. A reading of “0–2 ppm” cannot distinguish the fluoridation standard from double it; “2–10” cannot distinguish the cosmetic line from the enforceable one. You’d be running a test whose answer cannot change any decision you face.
What strips are actually good for:
- Confirming a high-fluoride well (5, 10+ mg/L territory) — “the strip maxed its first two bands” is real information at that scale.
- Quick checks on treated water where you expect near-zero and merely want a gross-confirmation that something isn’t badly wrong (even then: bands, not numbers).
What they cannot do, ever: tell you whether city water is at 0.7 vs 1.9, support a treatment-sizing decision, or verify a filter’s percentage removal. Those are lab-report jobs.
The self-deprecating honesty, stated plainly: we sell test strips for other analytes where their resolution fits the question (chlorine, hardness, iron). For fluoride, the honest answer is that most strip purchases answer nothing — and we’d rather you spend $30 more once on the lab kit than $15 twice on strips that can’t move your decision.
The Three Methods at a Glance — Cost, Time, Precision, Verdict
| Method | Cost | Time to answer | Precision | Best for |
|---|---|---|---|---|
| CCR (Consumer Confidence Report) | Free | 10 minutes | Utility-grade (system average + range) | City water — the first and often only step |
| Lab mail-in kit | $30–50 | 7–10 business days | Decision-grade mg/L | Wells, wide-range CCRs, anyone sizing treatment |
| Test strips | $10–20 | 2 minutes | Coarse bands only (the trap above) | Screening grossly high wells; confirming near-zero treated water |
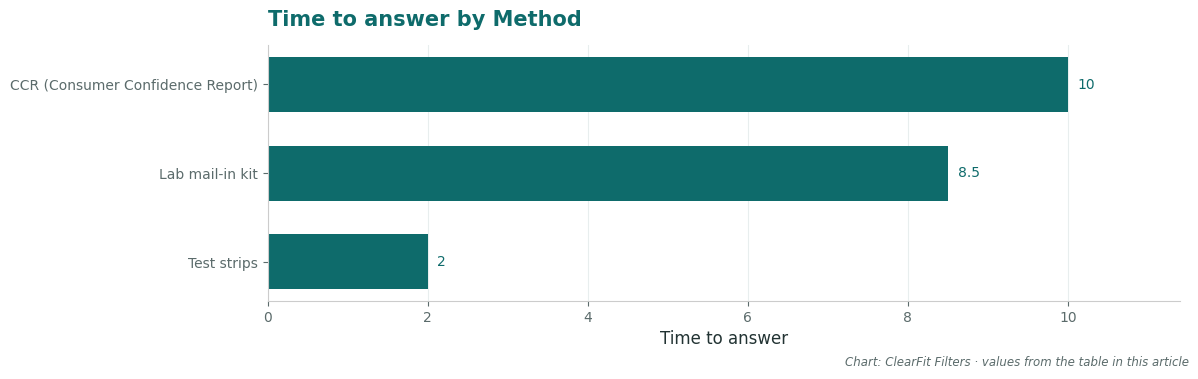
One honest ordering note: the methods are not interchangeable steps in a sequence — the CCR and the lab kit are answers, while strips are a rough gauge. Households that buy strips first usually end up buying the lab kit anyway, having spent $15 to learn what the resolution paragraph predicted.
The sampling protocol, done right (mail-in edition)
Fluoride sampling is forgiving compared with bacteria kits — no sterile technique, no overnight incubation drama — but three habits still separate a good sample from a compromised one. Fill the vial completely (no air gap — the analysis needs a full, unmixed volume). Sample the cold kitchen tap after a 2–3 minute flush — you’re pricing the supply, not Monday’s first draw (unlike lead testing, where first-draw is the point; don’t cross the protocols). Mail within a day or two of sampling — fluoride is chemically stable, but the lab’s holding-time window exists for a reason, and a sample that sat in a hot mailbox for a week is a sample you’ll wonder about. Wells: if the result drives a four-figure purchase, a second confirm sample at the same tap a week later is cheap insurance against a lab or sampling fluke.
Reading Your Number: the Action Table
| Your result (mg/L) | What it means | Rational action |
|---|---|---|
| < 0.7 | Below fluoridation target (natural low or non-fluoridated system) | The removal question is closed; spend nothing |
| 0.7–1.2 | Standard fluoridated supply | A values/preferences decision, not a numbers problem — if you want removal, see the methods page; if not, you now know your number |
| 1.2–2.0 | Above target, below cosmetic line (some natural-fluoride systems) | Children-under-8 households: this is the band where the fluorosis conversation starts; formula-prep arithmetic matters most here |
| 2.0–4.0 | Above the SMCL — cosmetic risk is real, legal line not crossed | Treatment is the standard recommendation for households with kids; test-first done, now treat — point-of-use RO covers drinking/cooking |
| > 4.0 | Above the enforceable MCL — utility action (city) or urgent well treatment | City: contact your utility (they have obligations). Well: treat for drinking immediately, retest after install, and read the fluoride page’s whole-house ladder |
The $30-and-two-weeks line: a mail-in test and a week and a half of patience converts the internet’s most argued water question into your specific, actionable number. Every decision downstream — including the decision to do nothing — gets cheaper and calmer after it.
FAQ
How can I test for fluoride in my water? Three real methods: the free CCR (city water — search “[your city] water quality report” and read the fluoride row), a lab mail-in kit ($30–50, 7–10 days, decision-grade data), or consumer strips ($10–20 — coarse bands only, useful for high-concentration screening, useless for 0.7-vs-1.5 questions). There is no accurate handheld home fluoride meter.
Does boiling water remove fluoride? No — it concentrates it (steam leaves, fluoride stays; boil off 10% and concentration rises ~11%). It’s the neighboring question everyone asks on the way to this one, and the answer belongs to the fluoride contaminant page.
Are home fluoride test kits accurate? Mail-in lab kits: yes, decision-grade (accredited-lab methods, mg/L reporting). Strips: accurate for their resolution, which is the trap — coarse ppm bands can’t distinguish the levels your decision actually hangs on. Match the instrument to the question.
How much does a fluoride water test cost? $0 (the CCR, city water), $30–50 (mail-in lab kit — the recommended route for wells and wide-range CCRs), or $10–20 (strips, with the resolution limits above).
How long do fluoride test results take? Mail-in labs typically return in 7–10 business days from sample receipt. The free CCR option is instant — it’s already published.
My well test came back high — should I retest before buying equipment? For readings near a decision boundary (2.0 or 4.0), yes: a confirm sample at the same tap a week later costs $30–50 and rules out sampling or lab variance before a $200–2,800 purchase. For dramatic readings (5+ mg/L), one clean-protocol result plus the treatment ladder is enough — retesting after installation is the verification that matters then.
What should I do if my fluoride level is high? Define high by the ladder: above 2.0, treatment becomes the standard recommendation for households with young children; above 4.0 (wells), treat drinking water promptly. City readings above 4.0 are utility-action events — contact them. The full treatment ladder — RO, alumina, bone char, distillation, with costs and claims — is the methods comparison page.
Next steps: Fluoride in Your Water (contaminant page) · Fluoride Removal Methods Compared · Is Fluoride in Water Bad for You?